Modeling
your own F1 (part 2):

 Phase
6: Modeling the wings. Phase
6: Modeling the wings.
 |
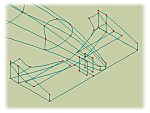
Create the wings side support with simple squares for
the rear and two patches for the front. |
|
Two parallel squares are enough to create the fixture
parts for both front and rear. |
|
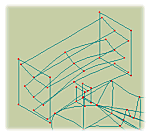
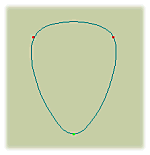
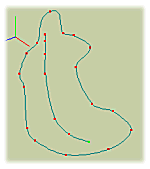
Draw  a three
points curve, give it a aerodynamic shape. Extrude a three
points curve, give it a aerodynamic shape. Extrude  it
once or twice depending whether you want it bendy or not. it
once or twice depending whether you want it bendy or not. |
|
Place  the
created wings at the correct position on the car body. Make sure the fixture
part touches the body. the
created wings at the correct position on the car body. Make sure the fixture
part touches the body. |
 Note:
My current wings are really simplistic but they do the job allright. I
didn't have any pictures of a real F1 when I modeled them but only screenshots
of F1GP2 .. hence the simplistic shapes ;-) Note:
My current wings are really simplistic but they do the job allright. I
didn't have any pictures of a real F1 when I modeled them but only screenshots
of F1GP2 .. hence the simplistic shapes ;-) |
 |
Phase
7: Creating the tires.
 |
|
Create a 4 points circle. |
|
Extrude ,
translate and scale  that circle profile to obtain the tire shape.
 |
|
 |
Phase
8: The alloy wheels.
 |
|
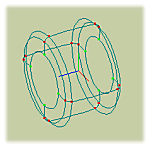
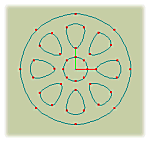
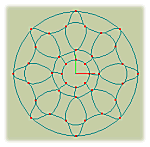
Using the model menu, create two 8 knots circles in the
XZ plan. One fro the outside and one for the inside of the wheel. |
|
With the add tool ,
create a three point loop. Move the
knots to obtain a suitable shape. |
|
Make a copy  ,
flip along Y, then translate along
Y to get a symetric position of both loops (so you can rotate around the
origin). ,
flip along Y, then translate along
Y to get a symetric position of both loops (so you can rotate around the
origin). |
|
Make three copies
of the two loops together and rotate  them
around the wheel. them
around the wheel. |
|
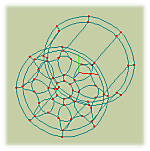
Create a long curve
and use it to create patches (zigzag weld it around the wheel as show on
the right). Weld the inner circle too! |
|
Extrude
the outside circle once to obtain an little bevel, then twice to create
the inside of the wheel. |
Note: When rotating an object, sPatch automaticaly
compute the rotation center as the geometric center of the selection. By
creating a symetric copy of the loop, this center becomes the origin, making
it easy to place our shapes around. |
 |
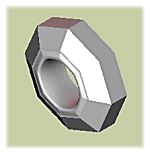
Phase
9: Bolts to hold the wheels.
 |
|
Create a 8 points circle and use the peak tool  on
it to get sharp edges. on
it to get sharp edges. |
|
Extrude ,
translate and scale
that octogon profile to obtain a nut shape. |
|
 |
Phase
10: The driver's seat.
 |
|
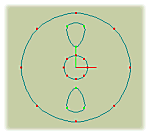
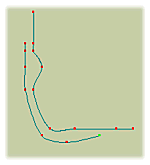
Use the add tool
to draw the ouline of the driver seat. Make sure it's symetric either by
using the grid or by drawing one half the clone ,
flip, translate and weld. |
|
Use the add tool
to draw a curve representing the bottom of the seat. Use an appropriate
number of points to ease the incoming welding operation. |
|
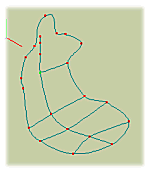
Create curve segments
and use them to create patches (by welding them horizontally as show on
the left). |
|
Extrude the
outline profile, move it
sliglty backward and scale
it down to give some thickness to the seat. |
|
 |
Phase
11+: all the rest.
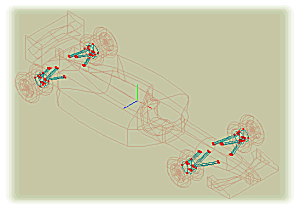
This tutorial covers the creation of a simple F1 model.
It gives general instructions, and is meant to guide you through, to show
you how things can be done in sPatch. It's now up to you to add all the
missing part of the car. Wheel support triangles, steering wheel, extra
aerodynamic curves ...
Render your
model
| Now, that our Formula 1 model is
complete, we can use it in some kind of rendering package. sPatch exporting
directly into Pov files, let's use Pov-Ray!
A minor drawback in sPatch is that
the export function groups all the layers in one big union (up to now:
ver 1.0b3), making it difficult to apply different textures to your model.
There is a way around it though, till mike clinfton implements a layered
export function.
Export only output the visible layers,
so to render your model with different textures applied to different parts,
apply this following procedure: |
 |
|
Select each layer one by one. Make only the current layer
visible. |
|
Export the current layer into a new pov file. Create
a new Pov file for each part of the car you want to assign a different
texture to (like wheels, tires, seat...). |
|
In the Pov-ray files you generated, add a #declare
a_name = before the generated union and remove the pigment
and finish lines at the end of the
file. Also remove the camera setting and the lights form the file (keep
a copy of that part somewhere). |
|
Create a new Pov file in which you include all the exported
files from sPatch and your texture file. Copy the original camera and light
setting you saved (they are a good start!). |
|
Now use your declared objects with object
{ a_name ... etc ... } and apply your textures to them ... RENDER!!
:-) |
Conclusion
If you are a Formula 1 fan, you
could argue that this model looks nothing like a real F1. It's got no air
entries anywhere, the wings look funny ... etc ... I know all this, I just
wanted to show how easy it is to model nice curvy objects with sPatch.
Moreover, I'm still working on that model and will soon create a set of
nice image map to stick on it to make it look even better.

return
to part 1
|